Dirt Cupcakes

dirt.jpg
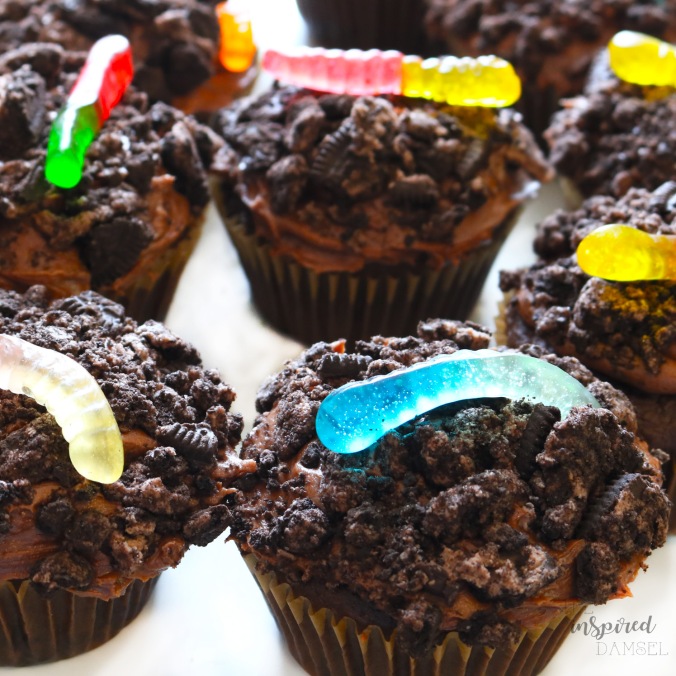
Spring is in full swing, and spring always makes me think of gardening and then gardening makes me think of dirt… Which then makes me think of dirt cake. This time though I wanted to try and turn it into a cupcake, but a cupcake with an Oreo on the bottom! This is a chocolate lovers dream. Honestly it’s rare that my family requests I don’t give away my desserts, but this time they wouldn’t let any leave the house. For the full video click here. 

Chocolate Dirt Cupcakes:

  • One boxed chocolate cake mix.
  • Cocoa powder if not thick enough.
  • Oreos for the bottom.
  • Oreos for top (about one row).
  • Gummy worms (sour will work too if you want).

Chocolate Cream Cheese Icing:

  • 8 oz softened cream cheese
  • 1/2 cup softened butter
  • 2 tsp vanilla extract
  • 3/4 cup cocoa powder
  • 4 cups powdered sugar
  • 2 tbsp milk

Pre-heat over to 350F. Mix chocolate box mix as usual, add cocoa powder if not thick enough for you. Put an Oreo in the bottom of each cupcake liner then fill with batter. Bake for about fourteen minutes or until toothpick comes out clean. Let cool.

In a stand mixer beat the cream cheese and butter, then add vanilla. Once fully combined add in cocoa powder and fully mix. Gradually add in powder sugar half cup at a time and scape the sides as needed. Add milk to thin out. Crush Oreos and then put in bowl. Once the cupcake are fully cooled gently put the icing all over them then into crushed Oreos and top with a gummy worm. Now enjoy!

DIY Pendant Light


light3
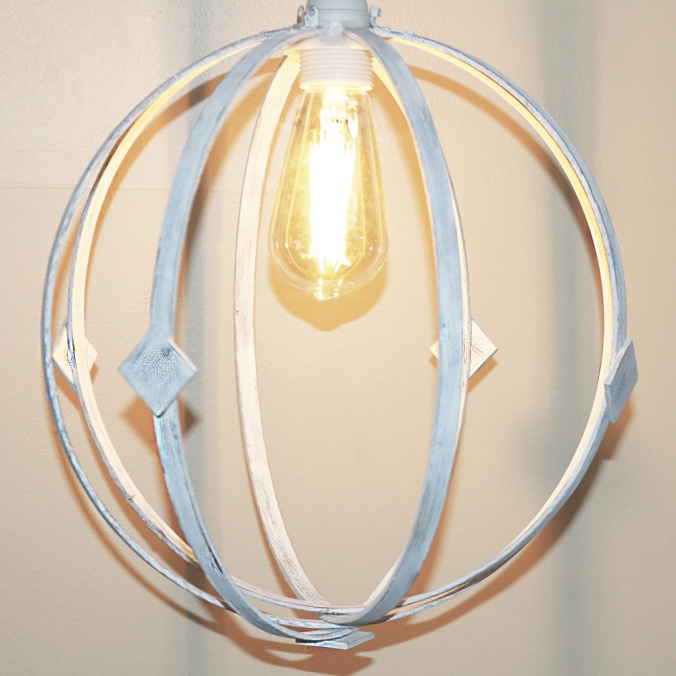
So once upon a time I saw this pendant light on ‘Fixer Upper,’ and I of course fell in love with it. I told my mom we needed it in our house and this what came out of that thought. The light they had used was expensive and so I researched any way to make it myself and I figured out the perfect way. Instead of bending the wood into the round shape, use wood that was already round, so what would that be? Embroidery hoops! After I had figured out the exact way to execute this light, I made a video so here all the step by step tiny little details from the video.

Product List:

  • Embroidery hoops. I used 10″ from Hobby Lobby
  • 1″ squares from Hobby Lobby
  • Sandpaper/block
  • Hot glue or E6000
  • Light kit from Ikea
  • Lightbulb, I think mine was from Lowe’s
  • Acrylic paint or stain

To get started I unscrewed the embroidery hoops and threw the screw away, because it’s not needed. Then I took something flat, in my case a nail file, and popped the metal off the outer hoops. When I made my first light like this I didn’t do that and so it’s not a necessary step but it makes everything look uniform and clean. Screen Shot 2018-03-12 at 6.52.03 PM

Next I sanded everything which is obviously self-explanatory. You do it to make sure the paint has a smooth surface to stick to. Now I painted. Whenever I’m doing anything that is going to look worn or rustic, I always start with a grey base so it looks like the white on top had been a bit more weathered. Screen Shot 2018-03-12 at 6.51.53 PM copyScreen Shot 2018-03-12 at 6.52.23 PM

Once the layers of paint were dry on the hoops and the squares mentioned earlier, I sanded them to give them the weathered looked we’re going for. Obviously you could just go with a white light or a stained light and not worry about this, but this just happens to be the style I was going for. Screen Shot 2018-03-12 at 6.52.28 PM

Next I started attaching everything. Luckily in the Ikea kit I linked above, it came with a plastic piece to the base that screws on and I was able to use that to glue everything onto. It also came with little notches in the piece so double luck! I used hot glue to do this but you could also use E6000, the only problem with using it is you need to tape the pieces to the base just so they’ll stay still while the glue is drying. With hot glue it dries so fast you only have to hold it for a few seconds and then it’s good. And I will say the hot glue has held as well the E6000 version. Screen Shot 2018-03-12 at 6.52.49 PM

Now I glued the squares half down every other hoop and onto the very bottom and then thread the cord back through and screwed it on. Then I was done! It’s a super easy twenty-four hour project that’s inexpensive and a great statement piece.

I hope you guys enjoyed this and the video, and maybe you’ll make this for yourself. I’m planning to make so many more DIYs as long as y’all want them, so until then; stay inspired!


Easy Super Bowl 2018 Food

Are you ready for some football??? It’s once again time for commercials, halftime, I guess a bit of football, and some great food. The Super Bowl is the time to pig out and not feel guilty as you watch the game. I’m going to be showing you how to make three different recipes that are easy to customize to what you like and will be a hit at your party. The whole video is on my youtube (click for link) but here’s all the nitty gritty details so are you ready?

Screen Shot 2a018-02-02 at 2.09.36 PM

Ingredients:

  • Biscuit Dough
  • Pizza Sauce
  • Cheese
  • Pepperoni

These are super simple, all you have to do is roll out your biscuits on a floured surface till they’re completely flat, then fill, and finally close. Bake at 350F for 14 minutes and you’re good. The thing about these though, is there’s so many options! You could do anything from basic pizza toppings like I did to meat lovers, it’s up to you but here’s some options. Chicken, BBQ sauce, and mozzarella, do this for a different take on a classic. Taco meat, salsa, and queso, try this for a Mexican twist. And finally marshmallows, chocolate, and anything else sweet for a dessert take.

Screen Shot 2018a-02-02 at 3.26.11 PM

Ingredients:

  • Chocolate Chips
  • Pretzels
  • 1/3 cup Flour
  • 1/2 cup Brown Sugar
  • 1/3 cup Peanut Butter
  • 2 tbsp. Butter (soft)
  • 2 tsp. Vanilla
  • 2 tbsp. Milk

Start by melting your chocolate chips in thirty second intervals until fully melted while putting down cupcake liners and then fill the bottom of cupcake liners with the chocolate, this is to create a base for everything to have a stable bottom. Put the chocolate filled cups into the fridge to chill while doing the next step. Mix with a hand mixer the flour, brown sugar, peanut butter, butter, vanilla, and milk all together until smooth and then chill if you think it’s too sticky, but otherwise just fill the cups with about a tablespoon of the dough. Congrats you just created eggless cooking dough. Not with a tablespoon or anything with a round bottom press into the dough to create a hole and this is where we’ll lay the crushed pretzels and then you just cover them with chocolate and once again chill in fridge. Then you’re done! To switch these up you could make chocolate chip dough, or snickerdoodle and add caramel, truly the possibilities are endless when it comes to mixing sweet and salty things.

Screen ASShot 2018-02-02 at 3.26.02 PM

Ingredients:

  • 1 can White Beans
  • Olive Oil
  • 1 Lemon
  • 1 tsp. Garlic Powder
  • 1 tsp. Onion Powder
  • 1 tsp. Cumin
  • 1 tsp. Curry
  • Salt to taste
  • Pepper to taste

To start this one off, you need to drain the beans, but don’t drain them in the sink, put all the liquid in a separate bowl as we’ll be using it. Put everything in your food processor, add as much of the three liquids (olive oil, lemon, bean liquid) as you believe is needed and then blend. This recipe is big in changing to your tastebuds so add as much or little of everything as you want. You could easily change this by adding roasted garlic or peppers into the hummus, changing up the beans, or the spices, the choice is up to you. Make sure to keep it chilled if not being used and serve with pita or naan.

So that’s it, three easy and customizable dishes for your Super Bowl party or your next snack. Most of the ingredients you probably have in your kitchen already, or if not they’re super inexpensive. I hope you guys enjoy these recipes and any that I have to come in the future, until then.

Stay Inspired, Emily.

DIY Floral Mobile


YOUTUBE VIDEO FOR VISUAL INSTRUCTIONS

So let’s make a floral mobile… chandelier? Whatever you wanna call it, here we go! I got the idea for this while we were getting ready to decorate for my cousin’s first birthday and I was browsing on Pinterest and saw a few things similar, but of course I decided to go in my direction with it. If I remember correctly I used a 10” and 6” inch ring for this project along with obviously flowers, the flowers were definitely the most expensive thing, so if you’re going to make this check for sales. Here are the links for all the products:

Now to get started I taped down the ring after measuring the perfect distance between the rings. I originally was going to use fishing line to connect the rings but because of fishing line being so thin and slippery, it didn’t work out so I ended up using twine which worked way better. Fishing line is typically ideal when you want to make objects appear like they’re floating and when decorating for parties it’s typically what I use but sadly it just didn’t work out so I had to go a different direction, which happens all the time in DIYs, you have to change your original plan. In case you’re wanting to use my exact measurements I used about 6 or 8 inches of twine and tied them off, hot glued them down, and also in some places taped them down. The downside to using a metal ring is how slippery they are so if you don’t mind using something thicker, I’d suggest an embroidery hoop, I’ll explain another reason why that may be ideal in a second.

Time to clip the flowers, now I do suggest doing this beforehand just so the project doesn’t take even more time, but honestly clip them all at once so you’re not doing it after putting each individual one on the ring. Here’s where I may suggest using an embroidery hoop again, because of the metal on the ring when I simply glued on it the flower moved around and popped loose on me, with an embroidery hoop since they’re wooden I don’t believe that would happen but I did find a solution. Using floral wire, I cut a piece about 5 inches long and twisted it together till a loop formed at the top, then I put the loop around the stem of the flower and hot glued it down. If you don’t secure it with the hot glue it’s very likely to have the wire slip off the flower since it’s hanging and not being used like a typical flower arrangement which would be secured into foam and not dangling in midair. I hate I didn’t get a closeup of doing this, but if you have any farther questions on that I can personally tweet you something if need be. But after gluing all the floral wire to the flowers I twisted the wire around the ring and even glued it onto that, because once again the metal was slippery and it didn’t want to stay directly in place. Even after doing so though, I still had to adjust the flowers when I finally did hang everything. But I repeated this process with the flowers, leaves I added, and the lavender I hung until the whole ring was covered then I repeated again with the smaller ring. To actually hang the whole thing, I did end up using fishing line and tied four different strings to different areas of the ring and then tied them all together so they could hang on a hook from the ceiling. Once you’ve done that, you’re done! I hope you enjoy watching the process and that this step by step may have explained things better, but I also hope that maybe you’re inspired to make this yourself. Tweet or Instagram me pictures if you do end up making it, don’t forget to like, comment, and subscribe to both here and my Youtube. I’m hoping to finally start posting more content so I will see y’all soon!