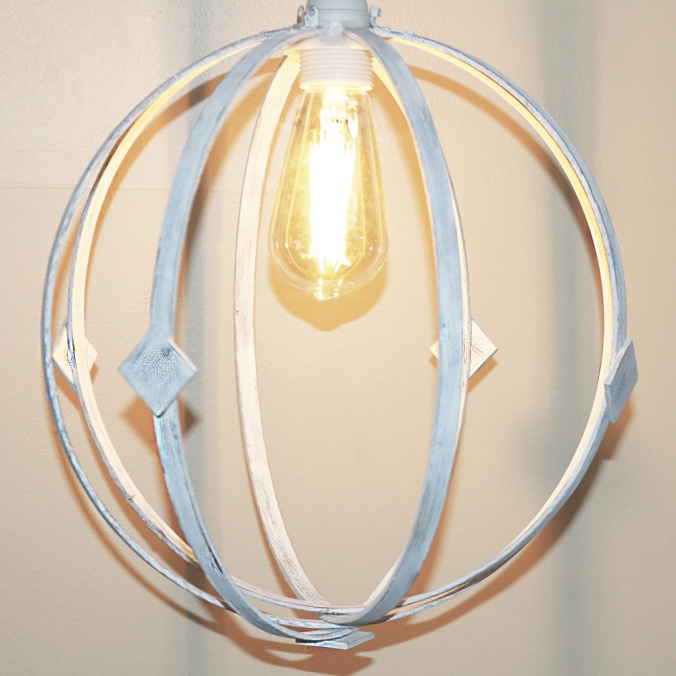
 So once upon a time I saw this pendant light on ‘Fixer Upper,’ and I of course fell in love with it. I told my mom we needed it in our house and this what came out of that thought. The light they had used was expensive and so I researched any way to make it myself and I figured out the perfect way. Instead of bending the wood into the round shape, use wood that was already round, so what would that be? Embroidery hoops! After I had figured out the exact way to execute this light, I made a video so here all the step by step tiny little details from the video.
Product List:
- Embroidery hoops. I used 10″ from Hobby Lobby
- 1″ squares from Hobby Lobby
- Sandpaper/block
- Hot glue or E6000
- Light kit from Ikea
- Lightbulb, I think mine was from Lowe’s
- Acrylic paint or stain
To get started I unscrewed the embroidery hoops and threw the screw away, because it’s not needed. Then I took something flat, in my case a nail file, and popped the metal off the outer hoops. When I made my first light like this I didn’t do that and so it’s not a necessary step but it makes everything look uniform and clean. 
Next I sanded everything which is obviously self-explanatory. You do it to make sure the paint has a smooth surface to stick to. Now I painted. Whenever I’m doing anything that is going to look worn or rustic, I always start with a grey base so it looks like the white on top had been a bit more weathered. 

Once the layers of paint were dry on the hoops and the squares mentioned earlier, I sanded them to give them the weathered looked we’re going for. Obviously you could just go with a white light or a stained light and not worry about this, but this just happens to be the style I was going for. 
Next I started attaching everything. Luckily in the Ikea kit I linked above, it came with a plastic piece to the base that screws on and I was able to use that to glue everything onto. It also came with little notches in the piece so double luck! I used hot glue to do this but you could also use E6000, the only problem with using it is you need to tape the pieces to the base just so they’ll stay still while the glue is drying. With hot glue it dries so fast you only have to hold it for a few seconds and then it’s good. And I will say the hot glue has held as well the E6000 version. 
Now I glued the squares half down every other hoop and onto the very bottom and then thread the cord back through and screwed it on. Then I was done! It’s a super easy twenty-four hour project that’s inexpensive and a great statement piece.
I hope you guys enjoyed this and the video, and maybe you’ll make this for yourself. I’m planning to make so many more DIYs as long as y’all want them, so until then; stay inspired!
